This article will give you the a simple way how to deploy a kubernetes cluster and it’s components on DigitalOcean Managed Kubernetes (DOKS).
Along with my learning journey with kubernetes, I started to get my hands on trying kubernetes on DigitalOcean. It’s actually one of my favorite hosting platform that also offers Kubernetes managed service (DOKS). I have some of my small projects running on k8s on DO, since it’s very easy to deploy and I can run completely manged k8s cluster with only 15 dollars per month!
Getting started
So now I’m going to deploy a new kubernetes cluster and try to run a simple service along with it. Not only that, I want my service to be internal and to have the ingress controller and a Load balancer in front of the cluster to serve the traffic.
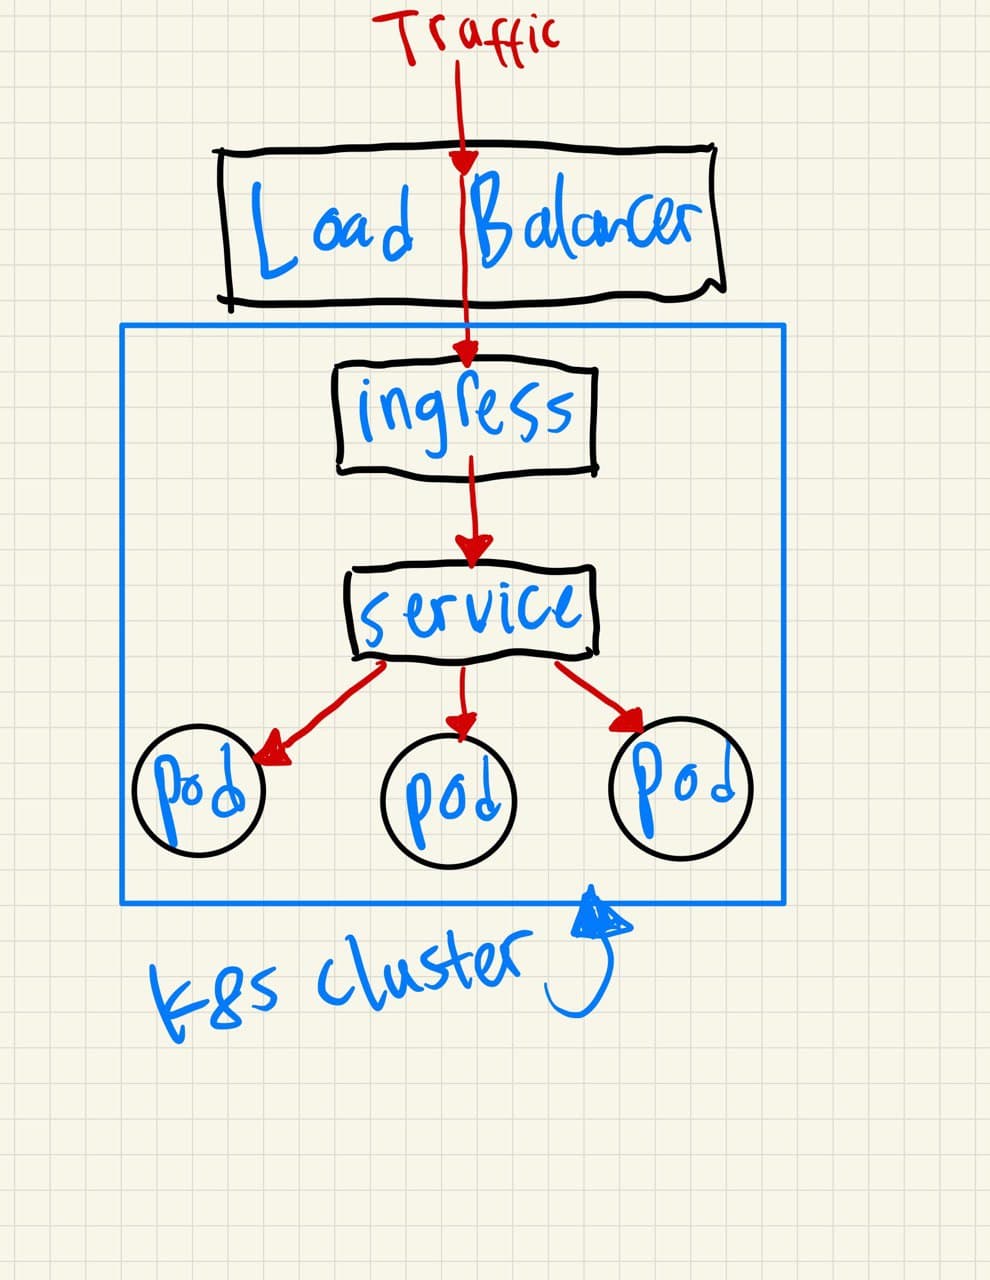
Let’s take a look at the picture below, if you familiar with k8s, this diagram must be quite straightforward. It starts with Load balancer and with ingress controller, the traffic goes through the internal service and eventually ended up to the pods.
Prerequisites
There are things you want to prepare before deploying kubernetes cluster on DO :
-
- DigitalOcean API (Create your own DO token here : https://cloud.digitalocean.com/account/api/tokens)
- doctl installed (Install here : https://github.com/digitalocean/doctl)
- A valid domain record for test the service (optional, example: myapp.com or app1.example.com)
Implementation
If everything set, let’s continue with the implementation. So as I mentioned before, deploying managed kubernetes cluster on DigitalOcean is quite straightforward.
Deploy cluster
First step, let’s deploy a new cluster on DOKS. We can do that simply by using doctl command line.
$ doctl kubernetes cluster create my-cluster --node-pool "name=my-cluster-node;size=s-1vcpu-2gb;count=1" --region sgp1
The command execution will result to create a new kubernetes cluster along with the node pool with only one node and minimum spec. You might want to change the parameters depends on your preference and also to change the region. In this testing, I’m deploying to Singapore region (sgp1).
and we just need to wait until it finished. The output will look like this:
Notice: Cluster is provisioning, waiting for cluster to be running
..................................................................
Notice: Cluster created, fetching credentials
Notice: Adding cluster credentials to kubeconfig file found in "/home/.kube/config"
Notice: Setting current-context to do-sgp1-my-cluster
ID Name Region Version Auto Upgrade Status Node Pools
d570cdaa-c985-495c-b6e7-d005aa1ef5dd my-cluster sgp1 1.20.2-do.0 false running my-cluster-node
Once the provisioning finished, check the current-context to make sure we’re on the exact cluster.
$ kubectl config current-context
do-sgp1-my-cluster
If everything looks good, then we have a new k8s cluster provisioned. Let’s continue to setup other stuff.
Deploy the internal service
Once we have deployed the cluster, if we take a look at the console (https://cloud.digitalocean.com/kubernetes/clusters), it will showing my new cluster :

And let’s create a YAML file to define our internal service.
# service.yml
apiVersion: v1
kind: Service
metadata:
  name: test-backend
spec:
  type: ClusterIP
  selector:
    app: test-app
  ports:
    - port: 80
      targetPort: 80
---
apiVersion: apps/v1
kind: Deployment
metadata:
  name: test-app
spec:
  replicas: 2
  selector:
    matchLabels:
      app: test-app
  template:
    metadata:
      labels:
        app: test-app
    spec:
      containers:
      - image: tutum/hello-world:latest
        name: test-app
        ports:
        - containerPort: 80
          protocol: TCP
Apply the YAML file :
$ kubectl apply -f service.yml
service/test-backend created
deployment.apps/test-app created
Check the service and if the pods are already running:
$ kubectl get service
NAME TYPE CLUSTER-IP EXTERNAL-IP PORT(S) AGE
kubernetes ClusterIP 10.245.0.1 <none> 443/TCP 129m
test-backend ClusterIP 10.245.93.249 <none> 80/TCP 28m
$ kubectl get pods
NAME READY STATUS RESTARTS AGE
test-app-65f85568c4-4t685 1/1 Running 0 29m
test-app-65f85568c4-6q49w 1/1 Running 0 29m
It looks like everything set and we already deployed our first internal service on kubernetes DigitalOcean. Let’s move on!
Deploy the ingress controller and Load Balancer
$ kubectl apply -f https://raw.githubusercontent.com/kubernetes/ingress-nginx/controller-v0.44.0/deploy/static/provider/do/deploy.yaml
namespace/ingress-nginx created
serviceaccount/ingress-nginx created
configmap/ingress-nginx-controller created
clusterrole.rbac.authorization.k8s.io/ingress-nginx created
clusterrolebinding.rbac.authorization.k8s.io/ingress-nginx created
role.rbac.authorization.k8s.io/ingress-nginx created
rolebinding.rbac.authorization.k8s.io/ingress-nginx created
service/ingress-nginx-controller-admission created
service/ingress-nginx-controller created
deployment.apps/ingress-nginx-controller created
validatingwebhookconfiguration.admissionregistration.k8s.io/ingress-nginx-admission created
serviceaccount/ingress-nginx-admission created
clusterrole.rbac.authorization.k8s.io/ingress-nginx-admission created
clusterrolebinding.rbac.authorization.k8s.io/ingress-nginx-admission created
role.rbac.authorization.k8s.io/ingress-nginx-admission created
rolebinding.rbac.authorization.k8s.io/ingress-nginx-admission created
job.batch/ingress-nginx-admission-create created
job.batch/ingress-nginx-admission-patch created
Note that after applied the ingress controller, it also deployed a new load balancer automatically:

And let’s create a new YAML file for the ingress definition:
# ingress.yml
apiVersion: networking.k8s.io/v1beta1
kind: Ingress
metadata:
  name: my-ingress
  annotations:
    kubernetes.io/ingress.class: "nginx"
spec:
  rules:
  - host: app1.example.com
    http:
      paths:
      - path: /
        backend:
          serviceName: test-backend
          servicePort: 80
As usual, apply the YAML file :
$ kubectl apply -f ingress.yml
ingress.networking.k8s.io/my-ingress created
View the ingress :
$ kubectl get ingress
NAME CLASS HOSTS ADDRESS PORTS AGE
my-ingress <none> app1.devopsid.com 139.59.195.196 80 5m34s
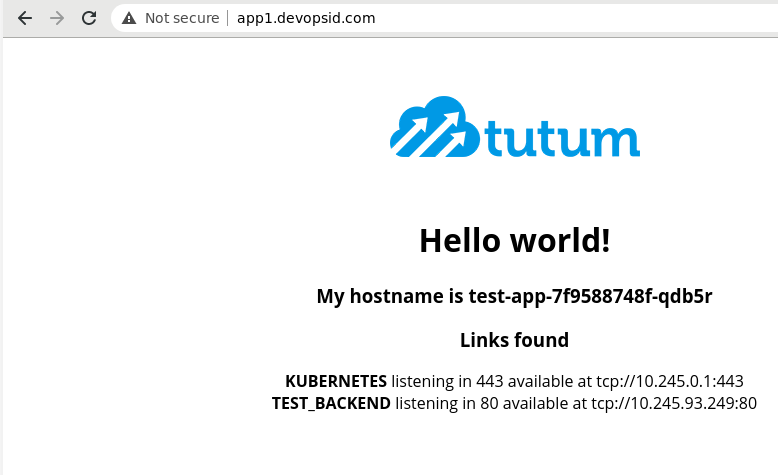
As you can see, after we have deployed the ingress, we will get the external IP address which is came from the external Load Balancer DigitalOcean. And as I mentioned before, I have created a new record on my DNS provider, and point the record app1.devopsid.com to the IP address of Load Balancer. so I can access the app via app1.devopsid.com.
Finally, let’s check our new app on browser. If it’s working fine, we should be able to see this web page :
If you got any questions, let me know in the comments!